step by step guide
start with ArduinoOTA basic example
void setup() {
  WiFi.mode(WIFI_STA);
  WiFi.begin(ssid, password);
  while (WiFi.waitForConnectResult() != WL_CONNECTED) {
    delay(5000);
    ESP.restart();  /* reload application */
  }

  /* register callbacks for OTA events */
  ArduinoOTA.onStart([]() { /* ... */ });
  ArduinoOTA.onEnd  ([]() { /* ... */ });
  ArduinoOTA.onError([](ota_error_t error) { /* ... */ });

  /* setup OTA for listening on default UDP-port 8266 */
  ArduinoOTA.begin();
}

void loop() {
  /* check for incoming OTA update */
  ArduinoOTA.handle();
}
open serial port to esp8266 and reset
# example output after reset
ets Jan  8 2013,rst cause:2, boot mode:(3,7)

# load binary
load 0x4010f000, len 3460, room 16
tail 4
chksum 0xcc
load 0x3fff20b8, len 40, room 4
tail 4
chksum 0xc9
csum 0xc9
v00040b70
~ld
Boot Messages and Modes, see also detailed documentation
at startup the ESP prints out the current boot mode example:
rst cause:2, boot mode:(3,6)
| rst cause | Description |
|---|---|
| 0 | unknown |
| 1 | normal boot |
| 2 | reset pin |
| 3 | software reset |
| 4 | watchdog reset |
boot mode:(x,y)
| x | GPIO15 | GPIO0 | GPIO2 | Mode |
|---|---|---|---|---|
| 1 | 0V | 0V | 3.3V | Uart |
| 3 | 0V | 3.3V | 3.3V | Flash |
note: y represents the position of the boot file
modify platformio.ini
; example platformio.ini
[env:esp01_1m]
platform = espressif8266
board = esp01_1m
framework = arduino

upload_port = COM6
monitor_speed = 74880
upload compiled binary via uart
note: close serial port
$ pio run -t upload
# or use upload button in vscode
open serial port to esp8266 and check Wi-Fi connection
# monitor output:
Ready
IP address: # your local IP #
modify platformio.ini accordingly
; new platformio.ini for OTA
[env:esp01_1m]
platform = espressif8266
board = esp01_1m
framework = arduino

upload_protocol = espota
upload_port = # your local IP #
monitor_speed = 74880
now you can upload new binaries via OTA
$ pio run -t upload
# or use upload button in vscode
what`s happening can be observed with debug_ser.py, PySerial needed !
$ python3 debug_ser.py

# serial output:
[OTA] Start updating sketch
[OTA] Progress: 100%
[OTA] End

ets Jan  8 2013,rst cause:2, boot mode:(3,7)

load 0x4010f000, len 3460, room 16
tail 4
chksum 0xcc
load 0x3fff20b8, len 40, room 4
tail 4
chksum 0xc9
csum 0xc9
v0004e770
@cp:B0 # copying new binary into boot flash region
ld

[Program] Booting
[Program] OTA and HTTPServer ready !
[Program] IP address: 192.168.10.108
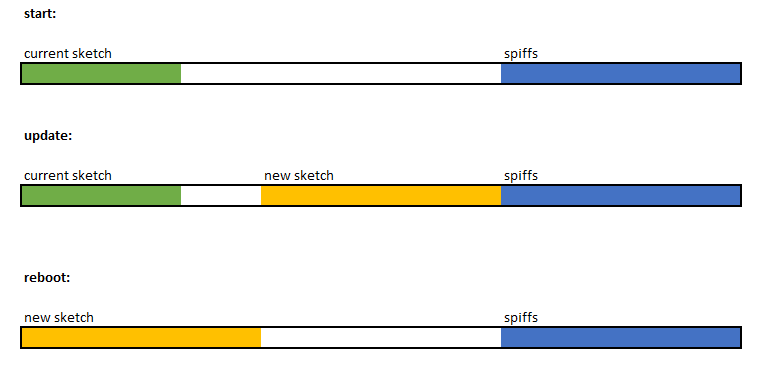
Process of updating